The plugin system makes it possible to extend and customize Amplenote to your heart's content. We provide hooks that make it possible to call third-party APIs, insert or replace arbitrary note content, act on prompts by the user, and much more, as described in the Plugin API documentation.
One of the most exciting aspects of Amplenote plugins is that you can make your own plugin, or change an existing plugin, even if you have very limited programming knowledge. Plugins are just a normal note, with a code block in a specific format. It doesn't take special software or knowledge of git to participate in the plugin ecosystem.
Bonus: If you care to share your creation, the Published Plugin Directory will let others potentially benefit from your efforts. 💝
On this page, we'll explain how to get started creating or modifying your own Amplenote plugin.
Normally an Unlimited subscription is necessary to publish a note, which is prerequisite to sharing a plugin in the plugin directory. If you want to build a plugin but don't have the cash available to purchase an Unlimited subscription, email support@amplenote.com, tell us what plugin you're going to build, and we'll grant you a complimentary Unlimited subscription. |
Want to earn money from building plugins? Amplenote is planning to offer the option for developers to sell their plugins by Q1 2025. In the meantime, we offer the plugin Bounty Board, where more than $20,000 is available for building plugins that Amplenote users would benefit from! 🤑 |
link🐣 The beginner's path: Write and edit basic code in the note
If you're new to programming, or if your plugin ambitions are low, the best starting point for authoring your own plugin is to duplicate an existing plugin and start editing it.
linkStarting option: Copy a working example to start from
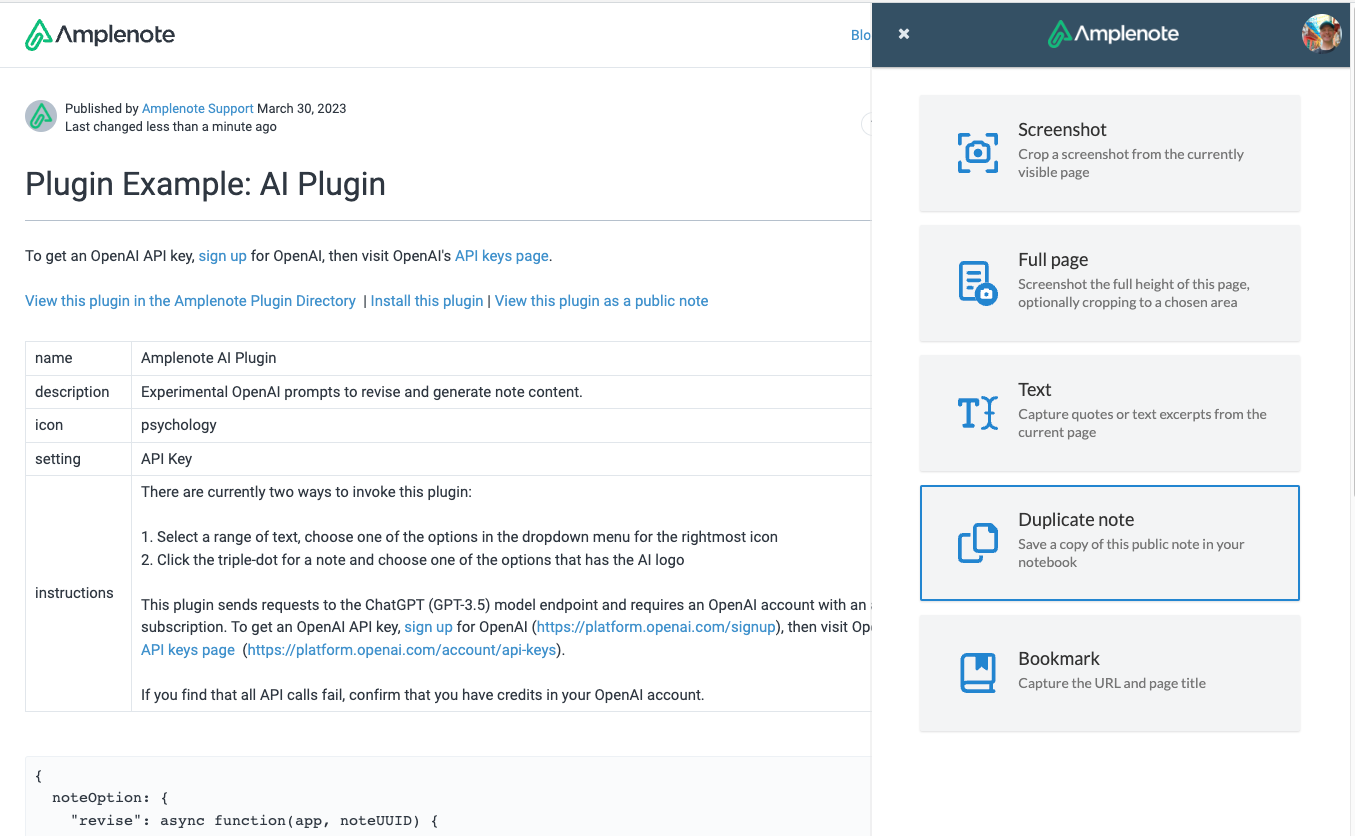
If you want to write a plugin related to AI (and who doesn't these days?), the best starting point is the Example AI plugin offered by Amplenote. If you have Amplecap installed, you can duplicate the code to your own notebook by visiting the note and then choosing the option to "Duplicate note":
If you don't have Amplecap installed, you can just manually drag through the entire contents of the note, copy your selection, and paste it into a note of your Amplenote account.
linkStarting option: Use our embed repo
The amplenote-embed-starter project can be forked to start creating a product that leverages Amplenote's powerful embedding framework, which can let you compile React components or render arbitrary Javascript within a note (or the Peek Viewer).
linkStarting option: From scratch 😰
If you don't want to copy from the AI plugin, you don't have to: Any note you create can act as a plugin as long as it has a table and a code block in it that validly define a plugin per the API documentation. The least you need is a table like the one shown in the screenshot (that gives your plugin a name, description, and whatever settings it will need), and then a code block below it that defines a plugin. That said, we usually recommend starting from an existing plugin so that you have a known quantity you can revert back to if you start getting a Javascript error that is difficult to understand.
linkIterating on your plugin as you go
Fair warning: Iterating on basic plugins is a much slower process than iterating on plugins within an IDE (Amplenote's core developers use Webstorm, which is a paid product. Visual Studio Code is a popular free product) and Javascript tests. Read more about this "Intermediate-to-Advanced" section when you're ready.
As you change your plugin, you will want to keep track of whether it is still valid. Here's how:
Visit Settings -> Plugins
Search for and select your note from the list alongside "Add a plugin", then click "Add Plugin"
If your plugin has settings, click the gear icon next to it and enter your plugin settings
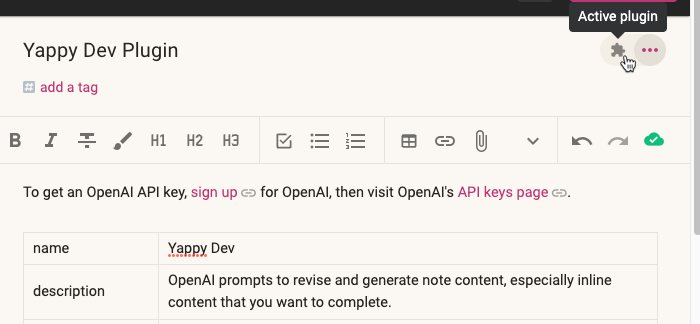
Now your plugin is installed and configured. When you return to your notebook and open the note containing the plugin, you will see an icon showing the plugin is active:
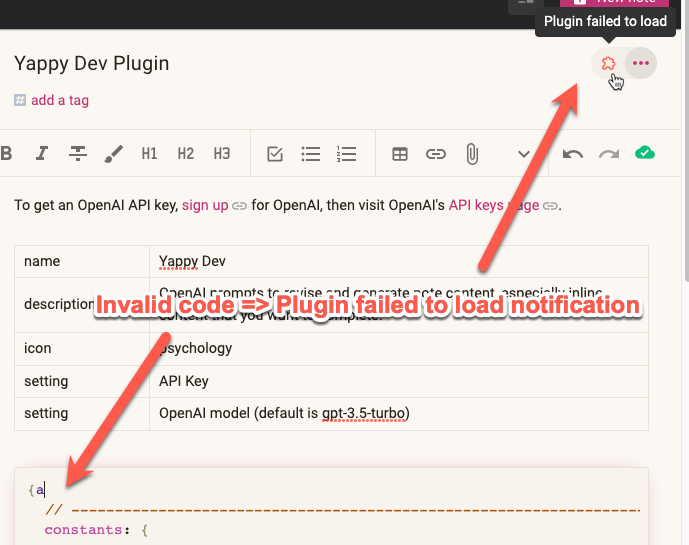
As you begin changing the code for the plugin, the icon will turn red if the code is not currently in a state that can compile:
linkSomething is broken, how do I debug this?
There are two main flavors of debugging that you may encounter during basic plugin development.
linkProblem with plugin not doing what I want
When the plugin doesn't do what you expect, there are a few options to get to the bottom of what's happening:
Use console.log to output state. Any plugin can include lines like console.log("The app interface is", app, "as of", new Date()) which can be viewed in your browser as long as you have Developer Inspector Tools opened.
Invoke debugger. If your plugin includes a call to debugger, you can often get your Developer Tools to pause with full context of the current app's state. The effectiveness of this method has not been well-tested, it may require a fresh page load to invoke.
Wrap try..catch around code where an exception might occur. For example, you can write try { dodgyCode() } catch(error) { alert("There was an error attempting to call dodgyCode: " + error); console.log(error); console.trace(); }
linkProblem compiling plugin
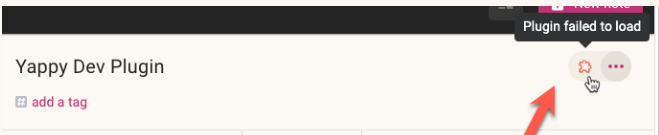
You can identify if there is a problem compiling your plugin via the existence of a red plugin icon at the top of the note:
In later versions, we hope to offer more detailed error messages to explain when the Javascript code can not be interpreted as a plugin. In the meantime, if you encounter this, there are a few options:
Undo until it works again. Assuming that you started from a working plugin, if you press Cmd-Z or Ctrl-Z enough times from within your code block, you will eventually return to the state where the plugin was not broken. You can watch for the changing plugin icon, which will try to re-compile and re-install your plugin every time a change is saved.
Look at DevTools "Console" output. Chrome and its variants offer a tab of "Developer Tools" or "DevTools," that can typically be accessed through the "View" menu. Once you have opened DevTools, you can click the "Console" tab and get at least a general idea about what went wrong.
Paste it into an IDE to spot syntax errors. If you download an code writing tool like Visual Studio Code (programmer code writing tools are called "IDEs"), you can paste your plugin's code into the IDE as a javascript file (create a new file called something like plugin.js). If there is a problem with the syntax of your Javascript, the code editor will underline it.
Check the version history. You can compare the current version of your plugin to past working versions by looking at its version history. You might want to do this in a separate window, so that you can look at your current plugin vs. its past versions side-by-side. To access a note's version history, the note options menu and the link for "View version history"
Stare hard and look for missing commas. Scrutinizing the code for a plugin until you can spot the bug yourself is the most brainpower-intensive way to resolve an issue, but sometimes it's the fastest way. The most common reason that plugins fail to install is that there is a comma missing between the different methods defined within the Javascript object.
If you expect to be editing the plugin frequently over the course of weeks, you may want to consider graduating from the in-note code editor up to something more industrial-strength:
link🤓 Intermediate-to-advanced plugin development for proficient developers
While it is possible to build a plugin completely within Amplenote, there are some significant benefits to using a programming IDE like Visual Studio Code or Webstorm to build your Amplenote plugin:
Instant visibility of syntax errors. In contrast to developing plugins within the note, an IDE will be much more explicit if you have made a syntax error in how you define your plugin object.
Faster iteration (BIG DEAL). New and intermediate developers habitually underestimate the cumulative impact of a slow iteration loop. Within the core Amplenote Dev team, there is no value we hold more sacred than "fast iteration times" (why do we care so much?). By writing tests, you can repeatedly invoke your plugin in milliseconds, rather than waiting for the Amplenote editor to reload the plugin, then revisit the note where you want to invoke your command and check what happens.
Step through code in a debugger (also Big Deal). An IDE with tests makes it possible to interactively inspect the state of your plugin as it executes code. Examples below.
More stability. By writing tests, you can ensure that later changes do not break earlier code that had worked.
The drawback is that, if you're not already a programmer, you will need to do some programmer stuff: choose and download an IDE, and utilize git to grab and commit code. Configuring an IDE and using git is outside the scope of this help article, but there are helpful developers you can find lurking in the Discord plugin channel. I hear Google can help with that sort of thing?
linkGetting started: Example repo
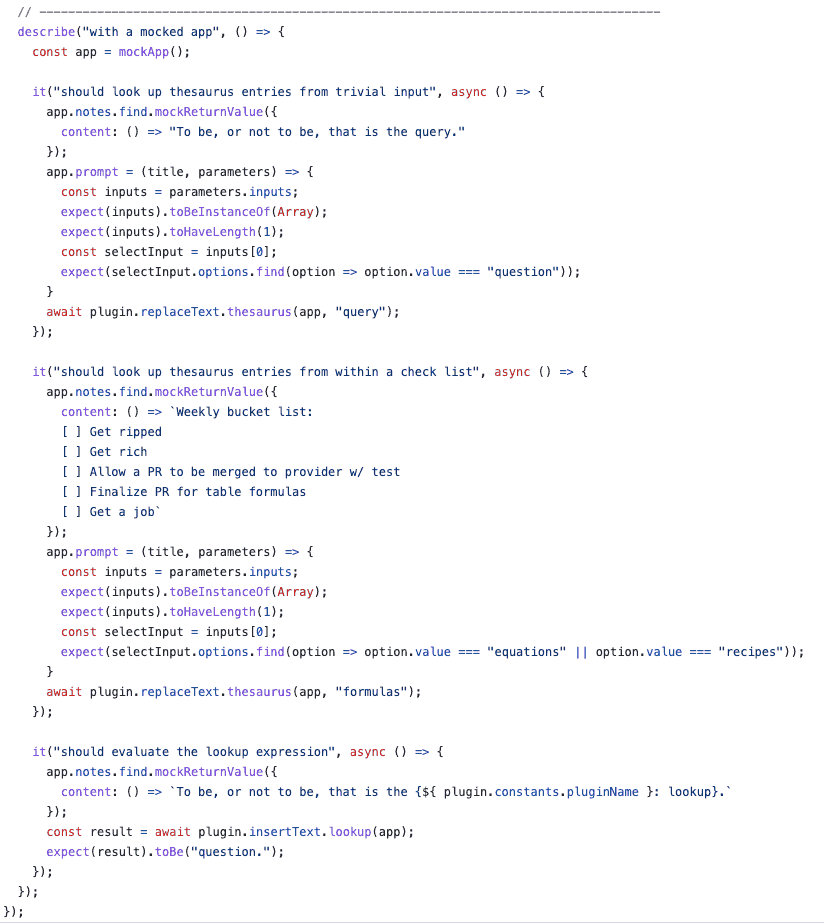
You can jump start your IDE plugin development by starting from Amplenote Plugin Template repo. From there, you can create files like the plugin.test.js file from the Yappy plugin, which has examples of utilizing a mocked plugin and app object in order to run an Amplenote plugin in your editor:
linkRunning the tests with breakpoints
linkMoving back to Amplenote
Chances are that if you have worked on a plugin for more than a couple hours, copying/pasting from your IDE to your note's code block will get old fast. That's why we strongly recommend using the Github->Amplenote plugin if you plan to develop your plugin for more than a couple hours. It will let you specify a public GitHub repo, and it will automatically aggregate your source file(s), bundle them together into a single code block, and paste that code block into the note from which you invoked the plugin. ✨
If you want to go low-tech, yes: you can just copy your plugin code from IDE back to Amplenote. But you have to highlight the object within plugin.js, absent the initial variable declaration, and the export at the bottom, and paste it into your code block, which gets old for those that recognize the primacy of a fast iteration loop on a "more enjoyable programming experience."
link🧑🏫 Learn by example
Some people's learning style isn't to read documentation, it is to just start tinkering with code from a working example. For this type of learner, the fact that every Amplenote plugin is an open source gives a great palette of starting points for experimentation.
Here is a gallery of examples, showing common use cases encountered by plugin authors.
For more in-depth examples of plugin-building, review code examples from existing Amplenote plugins:
Calls OpenAI's API for chatgpt-3.5 or gpt-4, via configuration (demonstrates an option to create settings with defaults)
Grab the portion of a note that precedes the user's cursor (to be interpreted as instructions)
Remember, if the code you got in an example Rich Footnote is missing too much context to be useful, go visit the plugin's full source code. You can find it after clicking through the plugin name in the list above.
link🤖 Let the AI write your plugin code for you?
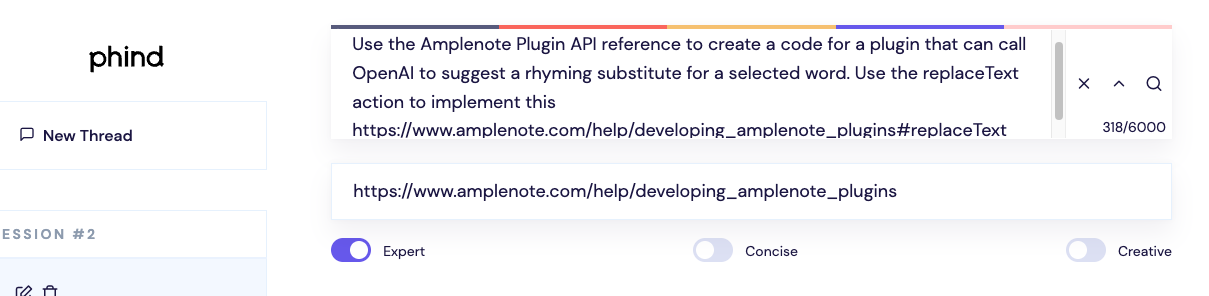
GPT-4 is good at writing code, but the tool available at phind.com is even better, because it can accept a link to reference documentation:
Here is the output that Phind returned for that particular query, which is indeed almost all the code needed to add a rhyming dictionary to Amplenote. It doesn't let the user choose between rhymes, but it gets a lot of the implementation correct, and with a slightly more evolved prompt, it could offer sufficient instructions for you to paste in to a plugin of your own. Tips for using phind to write your own plugin even if you're not a programmer:
Click the "expert" toggle so it uses gpt-4
Click the toggle on the right side of their search field to open "Advanced" mode, and paste the reference URL for Amplenote's plugin API documentation: https://www.amplenote.com/help/developing_amplenote_plugins
If you read the API docs enough to know which of the three actions you would like to target (insertText, noteOption or replaceText) you are more likely to get a usable result.
If your plugin code doesn't work at first, you can always provide it back to phind, gpt-4 or chatGPT to have it suggest where your syntax may be off.
linkExample case: Building the Note2PDF plugin
One plugin authored primarily by Phind was the Note2PDF plugin. To start, I queried "Example convert markdown text to download PDF in Javascript." The code returned initially by Phind (not shown because it wasn't very useful) didn't work because it expected to be able to download and wave an npm package, which isn't possible in a dynamically loaded plugin environment.
So, in the "ask a follow up question" section, located at the bottom of every Phind result, I clarified the initial prompt with "Rewrite the markdown to plugin implementation to use libraries that can be loaded by the browser dynamically, by fetching the scripts from a CDN." This gave something very close to workable:
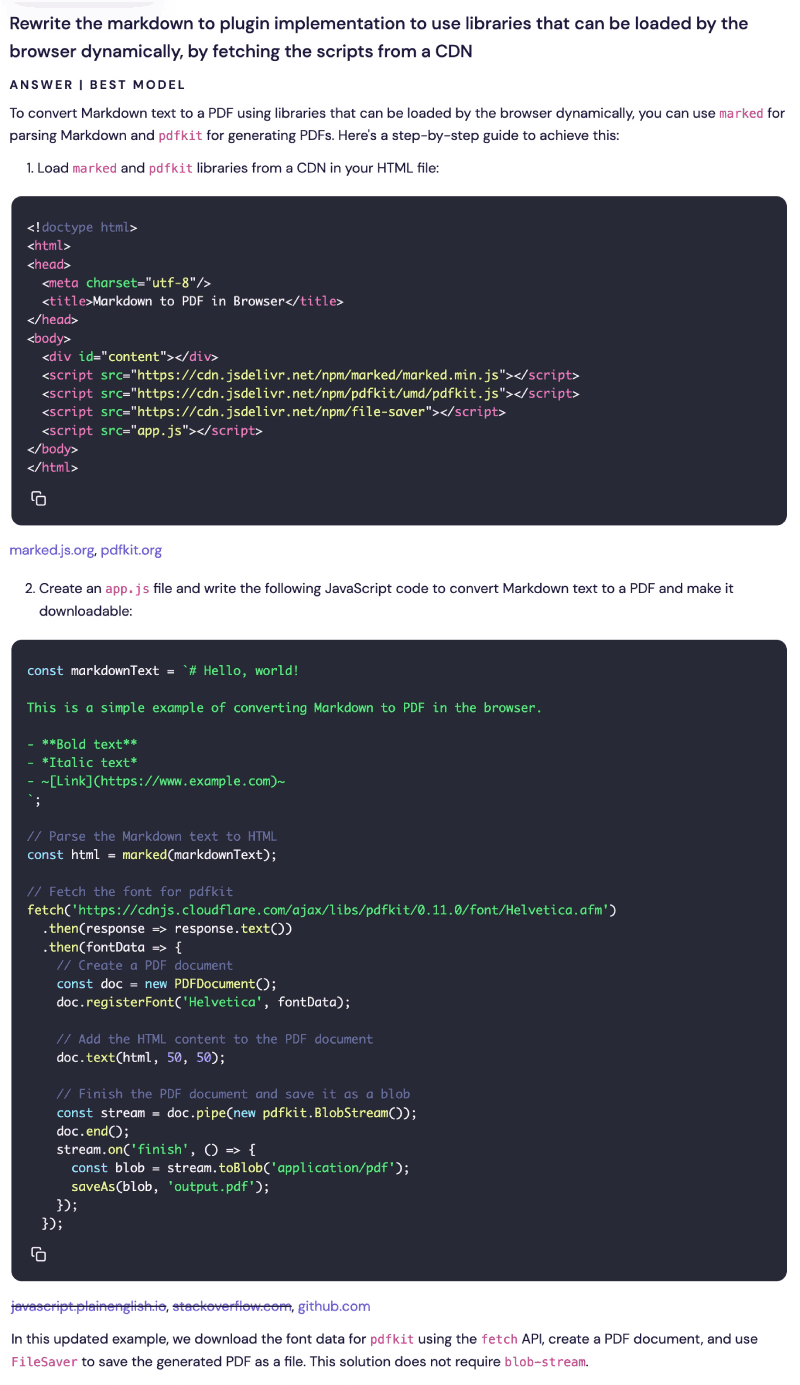
First version of Note2PDF plugin, as generated by AI
From here, I asked Phind two more follow up questions:
"Rewrite the above example without using the marked library." I submitted this follow up question because the code above didn't work the first time I tried it, and why debug a problem when you can easily swap in a substitute library that might Just Work? Phind substituted the showdown library, which succeeded on converting Markdown to HTML on its first try. 💫
"Rewrite the above example without using the pdfkit library." As with the above, the library didn't work when I first tried it, so I asked for an alternate library. Phind rewrote it using js2pdf and so far that has successfully generated a PDF from Javascript
How did I know to ask those follow up questions? I took the initial code I was given (in the screenshot above), broke it into a couple methods within my plugin, opened Chrome Web Inspector, and tried running the plugin on the note where I was building the plugin. I could see in Chrome Web Inspector that there were ambiguous Javascript errors being generated upon running the code. Since the error mentioned the "marked" library, I asked Phind to replace that library with something else. When the other library (pdfkit) also ended up generating an exception, it too was replaced for a library that worked on first try.
Along the way, to get a peek at what these unknown libraries were returning, I added console.log statements to see what the plugin was seeing:
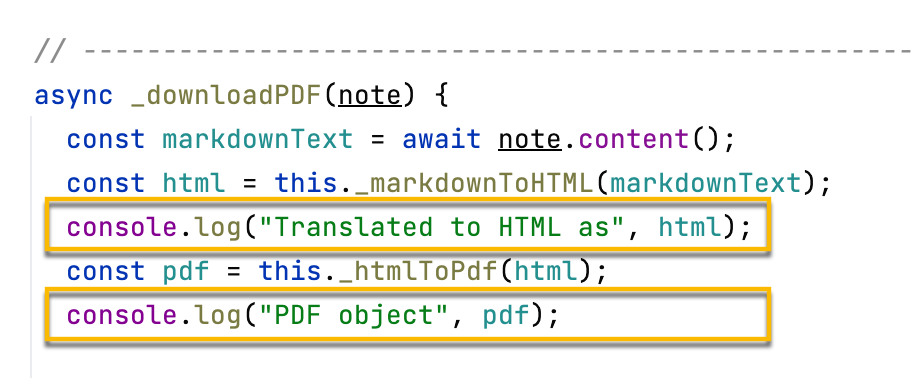
Upon inserting console.log statements, you can view the "Console" tab in Chrome Inspector to see what objects are being returned by libraries
These statements will allow you to dig in to the objects that your code is receiving, so you can diagnose which steps within the conversion process are working correctly, and which aren't:
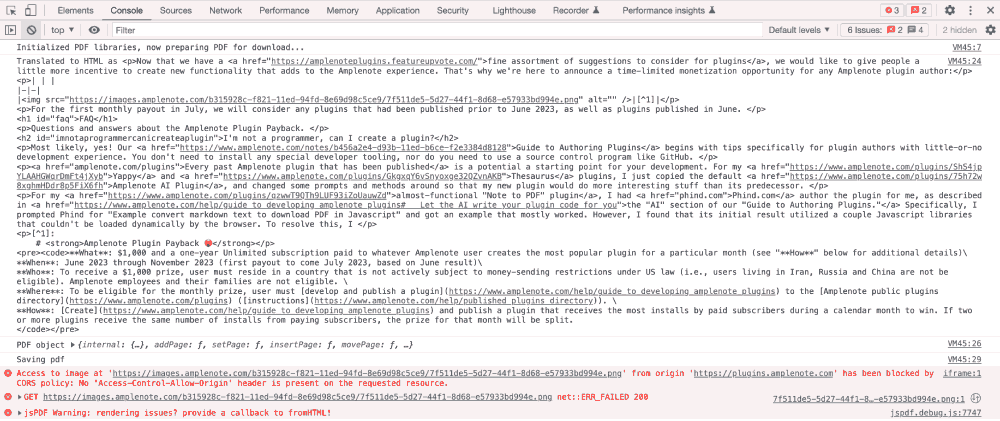
Viewing Javascript variables as revealed by console.log
As is evident by this output, the step that converts markdown to HTML is working like a charm. The step that converts HTML to a PDF seems to work, though one could click-to-expand any of those visible methods (addPage, setPage, etc) to confirm that the PDF was rendered correctly. The only remaining problem here is the download step. And the solution to the download problem is to reference the Amplenote Plugin API docs and discover the applicable method for downloading a saved file. ✨