linkWhat are automations and how are they useful?
Services like Siri Shortcuts, IFTTT and Pipedream allow you to connect Amplenote to other apps and services, in a way that can automate common, repetitive actions or integrate features from multiple apps.
The most common type of automation you can build will have a "Trigger and Action" architecture, that is you can make your automation run when something happens inside an app (the "trigger") and do something in a different app (the "action").
Note that Siri, IFTTT and Pipedream are third-party services and not related to Amplenote. The creation and usage of automations might be subject to an extra fee, based on how frequently they are triggered (although as of March 2023, both services provide limited, but free functionality).
Finally, note that currently Amplenote only registers "Actions" and no "Triggers". If you would like to use data triggers from Amplenote, please email us about it/create a feature request for it 🙏.
linkHow to create Siri Shortcuts with Amplenote Actions
From your Shortcuts app, click the Plus + sign to create a new Shortcut

This will create a new, empty Shortcut, which lets you start adding Actions. To add an Amplenote action, use the search bar or scroll to find Amplenote in your list of apps:

Amplenote currently supports the following Actions:

Name | Explanation |
Add to Daily Jots | Will insert the input at the top of the current daily jot, for the specified tag, as a task paragraph or bullet |
Add to Notes | Will insert the input at the top of the specified notes, as a task, paragraph or bullet |
Create Note | Creates a new note with specified tags |
Find Notes | Will return a list of notes that match the title query or the tag selection. |
Get Formatting | Lets you choose a format (task vs bullet vs paragraph) programatically |
Get Notes | Lets you select a set of notes to pass as input to other Actions |
Get Tags | Lets you select a set of tags to pass as inpout to other Actions |
Here's how the Add to Daily Jots Action looks:

For another example, check out Recording voice notes, speech-to-text or audio notes (OpenAi, Siri).
linkHow to use Shortcuts?
Shortcuts can be used to connect different apps together, for example for adding content from an third-party app inside Amplenote (vice-versa not possible currently). Also, using "Automations", you can trigger certain Shortcuts automatically, or when a certain event occurs.
For example, below is a Shortcut that syncs all new reminders from the Reminders app, and syncs them to Amplenote, once a day:

Did you create a Siri Shortcut? If you want to share it with other Amplenote users, please contact support@amplenote.com.
linkHow to set up an IFTTT integration
In IFTTT, an automation is called an "Applet". You can create an Applet from scratch or choose from one of the Applets that the community published so far.
To create an Applet from scratch, navigate to https://ifttt.com/create. First, choose a trigger, or a "If This" step:

Then, choose the app that you would like to connect Amplenote to. In this example, we will use Google Drive.

"New file in your folder" will make our Applet trigger whenever a new file is created in a particular folder in your Google Drive.
Triggers usually require some configuration. In this case, we need to log in with our Google Drive account and give IFTTT the necessary permissions. Then, we need to specify the name of the folder that we want to monitor using this Applet.

For different apps and triggers, the list of possible configurations will be different.
The second part of the Applet is the "Action" or the "Then That" step.

In this step, you should choose Amplenote from the list, and then choose the appropriate Action. In this example, we will create a task:
The parameters for this action lets you configure the destination of the task as well as the contents of the task.

The "Text" property will be the visible contents of the task that you create, while "Description" will be the added as a Rich Footnote applied to that text.
You can also add a URL or an image to the Rich Footnote that will be created.
"Ingredients" are the most powerful tool to configure the content that gets added to Amplenote. An "ingredient" is a field that gets pulled automatically from the trigger. In this case, since we are connecting to Google Drive, some useful ingredients we can access are the name of the file or metadata assigned to it. Use the "Add ingredient" button in the IFTTT interface to insert these variables:

Note the usage of line breaks <br>, to enable us to format text on multiple lines.
To finish creating your Applet, press "Create Action" at the bottom of the screen and then enable your Applet.
linkHow to set up a Pipedream integration
In Pipedream, set up your account and create a new workflow. The trigger, just like in IFTTT, will be from a newly created Google Docs, where we want to get the public link inside a task. To add such a trigger, we will need to use the Google Drive: New Files (Instant) trigger, and it will track any newly created files in the selected folder, in this example, the My Drive folder.

Once you have connected your Google account and chosen the drive folder, click on the "Create Source" button. A prompt screen will ask you to trigger an event.

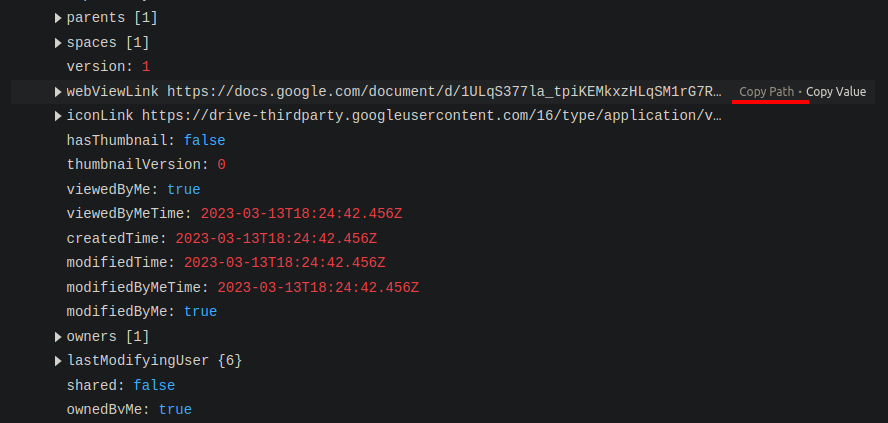
Go to your Google Drive and create a new Google Docs in the chosen folder. The screen should change, and prompt you to choose an event. As we want the link to the newly created document, open the event and click on the "more" blue button and copy the path of the webViewLink property. Click on continue once you're done.
You can now add a step, which is going to be to create a task in Amplenote. After connecting with your Amplenote account, you can select a note in the "Note ID" field and, on the "Nodes" field, you can type out what should go in the task. Keep in mind that the Node needs something in this format:
For more information, check out Amplenote's API docs
Click on the blue "Test" button and you should see a success message once it completes.

Now all that's needed is to deploy your integration!
linkPipedream usage examples
There are quite a few things you're able to do using Pipedream to automate your workflows. Some of them can be done using the Pipedream's default steps, but if you want to apply your own custom logic to it, you can create your own code using Python or JavaScript for your workflows. The following examples will assist you in how to do some common actions in Amplenote:
The examples include:
Adding a simple task containing text using the default Amplenote step from Pipedream
Adding something to the daily jot using a custom JavaScript step
Adding a task containing a link, using the default Amplenote step from Pipedream
Adding a task containing an inline tag using a custom Javascript step
linkExample 1 - Adding a simple task using the default Amplenote step
You can add a task to Amplenote using the default Amplenote step called "Create Task" , follow the steps shown on How to set up a Pipedream integration for the trigger. You can use any other trigger for this case, but we will stick to having a new Google Drive file be a trigger.
Once the trigger is set, you can add the Create Task step, connect your Amplenote account, select the note you want to send the task to and add the node you want. The JSON expression to add a task would be:

The end result would look similar to this:

linkExample 2 - Adding something to the daily jots using custom Javascript code
Very often users want to create automations that save some kind of data from outside Amplenote into Amplenote. The specific "destination note" of that data is not always obvious/we don't want any manual input to specify it. So the most common solution that people adopt is to send that data to the Daily Jot, because in Amplenote Daily Jots are the default "landing pad" and it's very easy to go back and review the captured data later on.
For this example, you can use any trigger that you may want, but the main change will be on the step, as we will want to add a task to today's daily jot. The make this possible, the use of code steps will be necessary. To create a code step, click on the plus icon under the trigger, type "Amplenote" on the search bar, select Amplenote and select the option "Use any Amplenote API in Node.js".
Here is the rough list of steps that we will need to implement in order to add something to the current Daily Jot:
Get today's date in Amplenote's daily jot format (IE - May 24th, 2023);
Get the list of notes that have been edited in the last 24 hours;
Find if the notes match today's jot date and get it's UUID;
The note also needs to be tagged as daily-jots;
If none match, create a new note titled for today's date and get it's UUID;
Add a task to today's jot
To get today's date on Amplenote's format and a valid time for the last 24 hours, create a Node.js step and add the following code inside it:
In this code block, we're using the Luxon library to facilitate the date calculations and transformations. We get the local date time day and calculate it's module by both 10 and 100 to know which suffix to add, transform the date format into a long form string, append it with the suffix and the year. We later export the calculated date and the last 24 hours in seconds to be able to use it in other steps.
For the second step, we will get daily jots created in the last 24 hours that match today's date or create a new jot, based on the results of the previous steps. For this, create a new step, type and select "Amplenote" and select the option "Use any Amplenote API in Node.js". This will create a basic structure to call Amplenote's API using the Axios library.
We will add the following code to the code step:
The code above should either get today's jots UUID, or create the note before getting it's UUID. If it created a new jot, you should be able to see it in your account.
For the third and final step of this example, we will create a code step that creates a task and adds it to the daily jot, using the UUID we got from the previous step. The code block should have the following code:
After testing the code, you should be able to see your current/new daily jot with a task inside it.
linkExample 3 - Adding a task containing a link, using the default Amplenote step from Pipedream
In this example, we will use the default Add task step to add a task with an inline tag to a specific note in your Amplenote account. Inline tags are simply links to other notes, so in our object we need to prepare a "paragraph" type node, that contains some text (usually the name of the note - in this case "@home") and a link to that note (formatted as https://www.amplenote.com/notes/NOTE-UUID).
In Amplenote, inline tags are used as a way to group together similar information (especially when using Tasks Mode and Calendar Mode to filter by inline tags aka "note references"). Therefore, adding an inline tag to a task is a common practice and a useful thing to be able to do with the API/Pipedream steps.
For this, you can repeat the process done for the example 1, but change the Nodes JSON to the following query:
- as shown in the screenshot:

The result will look like this:
Remember to check Drive Inbox @home
linkExample 4 - Adding a task containing an inline tag using a custom Javascript step
For this example, we will add an inline tag again, this time using a custom Javascript step. For this, we will need to create steps to:
Get the UUIDs of the destination note as well as the inline-tag note;
Make a POST request to the API.
For the first code step, we will add the following code:
Here, we hardcoded the name of the notes. However, changing the code to allow you to pass props to the code step might prove useful if you want to change in the future.
For the next code step, we will get the two notes and add the task inside the home note, while also keeping an inline link to another note in the task title. This can be achieved with the following code:
After the testing, you should see the results in Amplenote with a task called Remember to check the drive Inbox @home, where @home is a backlink to another note.