For subscribers with an Unlimited plan or above, Amplenote offers a powerful connection option to let a frontier LLM read through your notes and write/proofread/edit or search your note content.
This connection is called an "MCP Server." As of its v1 debut in 2026, the process of enabling your local MCP server requires a few steps of one-time setup. This page details the necessary setup.
linkBenefits of utilizing the Amplenote MCP Server
Why bother setting this thing up in the first place? Many, many reasons.
Conceptually, the connection you make when you enable the MCP server is that an agent the frontier of intelligence can stand in for you, reading, editing or authoring any note, table, or task in your account.
Several specific examples, with prompts, are given in the Examples Section.
Yes, many of the examples are already possible by using Ample Agent Pro. But, unlike Ample Agent, the Claude/Codex harness that uses MCP Server is working from a totally separate window with all its own memory and resources.
That means you can continue using Amplenote without any slowdown, or uncertainty about the progress of the task underway. For long-running commands, being able to interact with your personal knowledge store through a standalone app is a great way to minimize the distraction within your Amplenote app as you continue to work.
linkInstall MCP Server for Claude or Codex Use
Steps to follow to let your frontier LLM of choice get access to control the content you see in Amplenote.
link1. Subscribe at "Unlimited" or "Founder" level
The MCP server delivers similar value to what Amplenote offers as the "Ample Agent Pro" plugin, so there will probably be some users that elect to upgrade to Unlimited + MCP, and skip the monthly cost of Ample Agent Pro.
Of course, Founder subscribers automatically skip that cost, so upgrading to Founder gives you full access to every flavor of frontier AI throughout your Amplenote notebook.
link2. Download & Install Ample Desktop, Open Amplenote => Settings
Once you're running the desktop app, you can choose the "Settings" option under the desktop app's leftmost non-system menu.
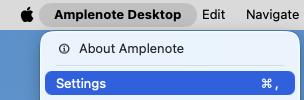
Opening settings from macOS after installing
After you open settings, you'll find a toggle to enable the MCP server:
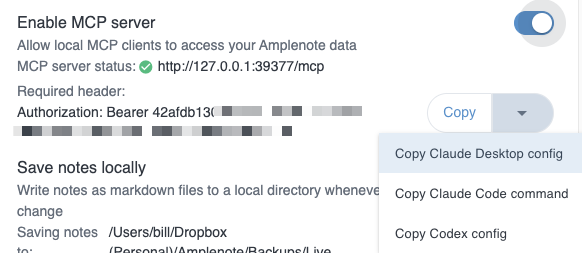
MCP toggled on
After you have toggled on the MCP server (meaning: the toggle head is on right side, and you see the saturated toggle background, usually blue), you'll see a "Copy" menu
link3. Click the "Copy" menu and choose which desktop LLM you want to connect
Next, click the "Copy" button, then click whichever provider you want to connect with Amplenote: Claude Desktop, Claude Code, or OpenAI Codex.
After you click your preferred option, the configuration settings needed to tie together Amplenote with your app will be available in your clipboard. Now you're ready for the provider-specific integration.
linkApply the copied configuration in your Claude or Codex app
Each app uses the copied Amplenote MCP details a little differently. In all cases, keep the Amplenote desktop app open while you are using the MCP connection. The copied URL points to 127.0.0.1, which means “this same computer.” A cloud-only chatbot, a remote server, or a different computer will not be able to reach that address.
Also: the copied text includes a private bearer token. Treat it like a password. Do not post it in screenshots, support tickets, shared chat transcripts, or public repositories.
linkOption A: Claude Desktop
After you choose Copy Claude Desktop config from Amplenote’s MCP copy menu. It will copy something like this into your clipboard. To install it:
Open Claude Desktop, or sometimes called simply "Claude"
Open the app menu and choose Settings.
Open the Developer tab.
Click Edit Config. Claude Desktop will show you that it stores this file at
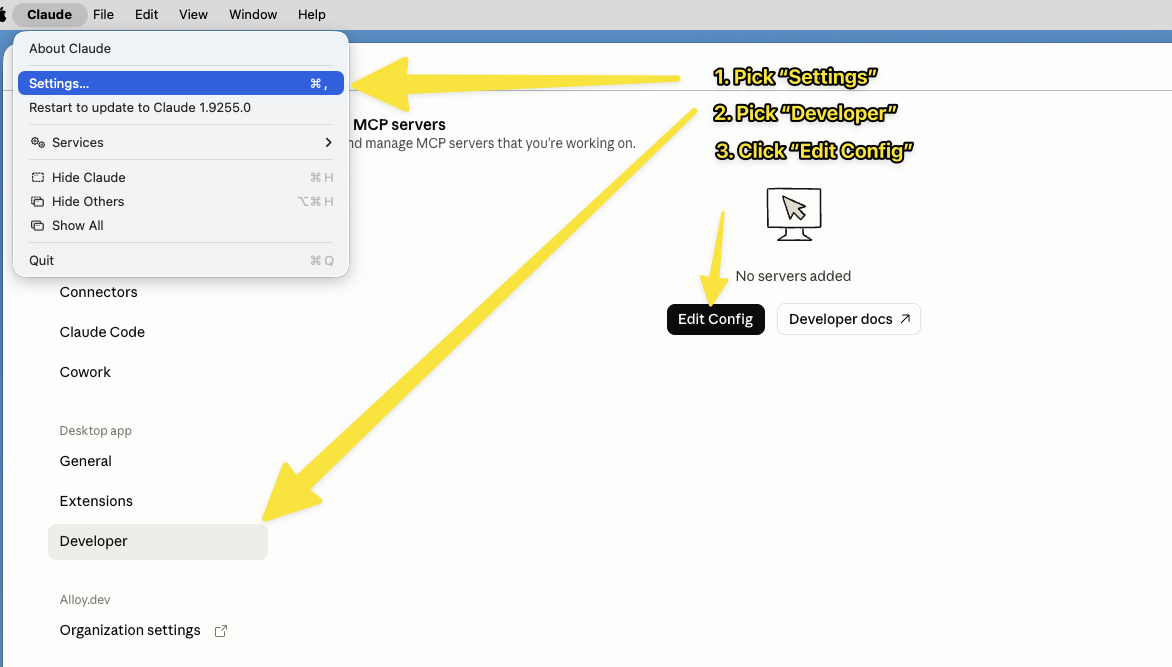
~/Library/Application Support/Claude/claude_desktop_config.json on macOS and
%APPDATA%\Claude\claude_desktop_config.json on Windows.
Open the file with your text editor of choice (e.g., TextEdit on macOS, Notepad on Windows).
Paste the Amplenote config into the file.
If the file is empty, paste the whole copied JSON object.
If the file already has other MCP servers, do not replace them. Add amplenote as another entry inside the existing mcpServers object. For example:
If the file has other contents besides an mcpServers key, paste the "mcpServers" block as a sibling of the other root/top-level keys (like "preferences"). Be sure to put a comma between the previous top-level config block, and the "mcpServers" config block, if the mcpServers block didn't exist. Then:
Save the file.
Completely quit and restart Claude Desktop. Claude Desktop needs to restart before it loads newly added MCP servers.
Open a new Claude chat and look for the MCP/tools indicator near the message composer. Click it to confirm that an amplenote server is listed. Claude’s MCP UI only appears after at least one MCP server is configured correctly.
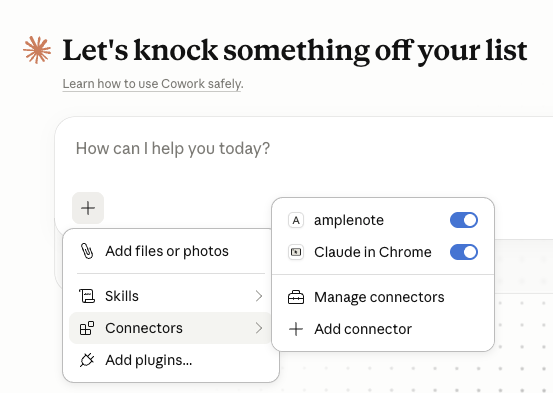
After restarting Claude, you should be able to see "amplenote" among your "Connectors"
After you've confirmed Amplenote is visible, try a prompt like:
Using Amplenote, find my notes about Japan travel and summarize the three most recent ones.
Claude may ask for permission before using tools that read or modify your notes. Review the requested operation before approving it. Example output when querying for a summary of recent notes about Amplenote branding.
If you're using Claude from a subscription belonging to your organization, see Using Amplenote MCP Connector inside an Anthropic organization.
linkOption B: Claude Code
Choose Copy Claude Code command from Amplenote’s MCP copy menu.
To install it:
Make sure Amplenote Desktop is running and the MCP server is enabled.
Open a terminal.
Paste and run the copied command (on the command line, not within Claude). Note that this will make the Amplenote MCP server available specifically in the project that the command is run.
Verify that the server was added:

Successful copy/paste of Claude Code command
Start Claude Code:
Inside Claude Code, run:
The /mcp panel shows configured MCP servers and their tool counts. Confirm that amplenote is connected.
Now try:
Using the Amplenote MCP server, find my note about the customer call from last week and list any open tasks in it.
Claude Code will use the MCP connection when the request requires Amplenote data. If it does not choose the tool automatically, make the target explicit: “Use Amplenote,” “Use the amplenote MCP server,” or “Search my Amplenote notes.”
If you're using Claude from a subscription belonging to your organization, see Using Amplenote MCP Connector inside a Anthropic organization.
linkOption C: Codex
Choose Copy Codex config from Amplenote’s MCP copy menu. It will copy something like this.
To install it:
Open Codex’s config file. By default, Codex stores user-level configuration at:i
Codex’s IDE extension can also open this file from the gear menu via Codex Settings → Open config.toml. Codex’s CLI and IDE extension share the same MCP configuration.
Paste the copied [mcp_servers.amplenote] block into config.toml. For example, pasting it near the top of the file after the initial few variables.
Save the file.
Restart Codex or start a new Codex session.
In Codex’s terminal UI, run:
Codex documents /mcp as the way to view active MCP servers in the TUI. Confirm that amplenote is listed.
You should see "amplenote" listed among the MCP entries after typing /mcp
For newer Codex versions, a direct HTTP configuration can also work because Codex supports streamable HTTP MCP servers with bearer-token authentication. The Amplenote-provided npx mcp-remote version is a compatibility-friendly option. If you prefer direct HTTP, the equivalent shape is here.
Or, to avoid putting the token directly in config.toml, use this block. Then set the token in your shell before launching Codex.
After setup, try:
Use Amplenote to find my notes about “quarterly goals,” then create a prioritized task list for today based on unfinished tasks you find there.
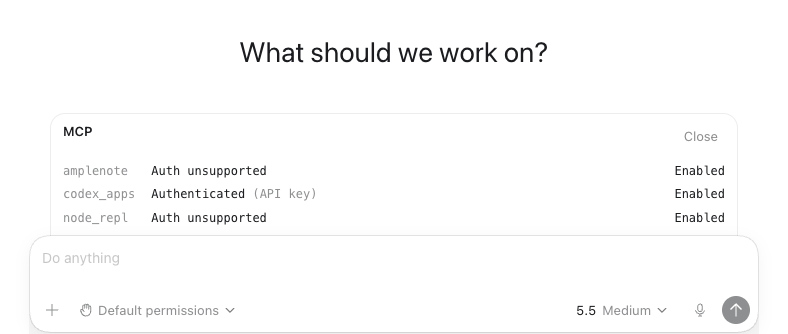
linkUsing Amplenote MCP Connector inside an Anthropic organization
If you log into Claude with a Teams subscription associated with an organization, the default Anthropic "organization" configuration disables Connectors acting without tediously approving each individual action. This can be fine if you're doing a one-shot change, but for any use case that involves batch changing notes, you'll be best off visiting "Organization Settings" and picking "Cowork" to enable the MCP server users to choose "Always allow":
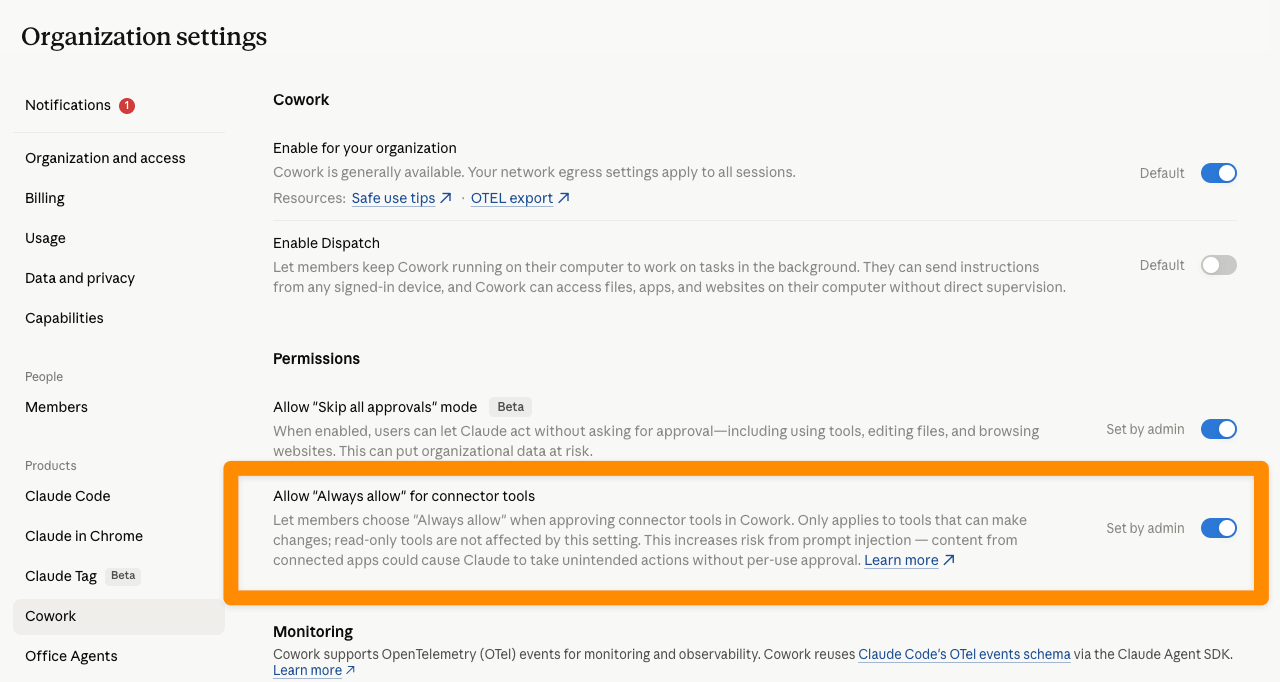
This will allow "Allow for all tasks" to be selected when the MCP server is updating multiple notes for a command issued.
linkConfirm Amplenote is available before asking for changes
After configuring your LLM client, confirm these four things:
Amplenote Desktop is open. The MCP server is hosted by the desktop app.
The MCP toggle is enabled in Amplenote Settings. The status should show a green/connected indicator and a local URL such as http://127.0.0.1:39377/mcp.
Your LLM app shows amplenote as connected. In Claude Desktop, check the MCP/tools indicator. In Claude Code or Codex, use /mcp.
Your first instruction names Amplenote explicitly. For example: “Using Amplenote…” or “Search my Amplenote notes…”
If the LLM says it cannot access Amplenote, re-open Amplenote Settings and compare the URL and token with the config you pasted. If the port or token has changed, copy the config again and replace the old config.
linkExamples and use case idea prompts
The MCP server exposes Amplenote operations to the LLM so it can read, search, create, and update information in your workspace. Conceptually, many operations mirror what Amplenote plugins can do through the App Interface: create notes, search notes, retrieve note content as markdown, insert note content, insert tasks, update tasks, get task domains, and navigate to notes or tasks. Amplenote’s plugin API documents these capabilities, including app.createNote, app.filterNotes, app.searchNotes, app.getNoteContent, app.insertNoteContent, app.insertTask, app.updateTask, and app.getTaskDomains from the app API docs alone.
The highest leverage MCP use cases are those that use it to review and change a set of notes in one command.
Try prompts like these:
linkUpdate a set of tagged notes
Review all notes tagged "gitclear/help" and search for any references to navigation tabs. When a note references the ”Work in Review" tab, change it to specify the "Retrospective" tab. Where there is a screenshot of the tab, remove the screenshot. Keep a running tab of changed notes in a "GitClear MCP Updates" note that you create and write to. Specifically call out outes where a screenshot was removed.
linkRecommend note changes
Review all notes tagged "amplenote/help" that have not been updated in at least 18 months. We will create a table, with a link to each old note, and columns that help identify the value of upgrading it. Assess the staleness of each note by parsing Amplenote's current features listed at https://www.amplenote.com and https://www.noteapps.info/apps/amplenote. In the "Upgrade opportunities" column, give a prioritized list of which sections could be amended or improved. Create a 1-5 rating on how imperative this page is to modernize.
linkIntegrate into network
Let's tighten the connectivity between my GitClear help pages. Please review all notes that have been created in the past 12 months with the "gitclear/help" tag. If the note's content is related to a different note, ensure a "Related links" section exists at the bottom of the note, and make a bullet list of links to notes that discuss similar or "add on" content. Prefer to link to a specific section within a note (e.g., Examples and use case idea prompts) for the highest-relevance connection.
linkFind a note from partial memory
Search Amplenote for the note where I wrote about meeting a founder at a coffee shop. I think it was created in March or April? Show me the best matches and explain why each one might be the right note.
linkTurn a note into tasks
Read my note “Q3 launch plan” and create tasks for the concrete next actions. Put them in the same note, grouped under “Next actions.”
linkClean up stale tasks
Find open tasks older than 60 days in my main task domains. Suggest which ones to delete, defer, or rewrite. Do not modify anything until I approve.
linkPrepare a weekly review
Search my completed tasks and recent notes from this week. Create a “Weekly Review” note with wins, unresolved decisions, and next week’s priorities.
linkMood tracking and reflection
Find my recent mood-tracking notes or daily jots. Summarize patterns between mood, exercise, and task completion. Create a short reflection note with three suggested experiments for next week.
linkAdd tags or organize notes
Find notes about “AI ROI” that are not tagged
gitclear/ai-roi. Show me the candidates first, then add the tag after I approve.
linkProvider differences
linkClaude Desktop
Claude Desktop is the most visual setup path. You paste JSON into claude_desktop_config.json, restart the app, and confirm the server from the MCP/tools indicator. It is a good choice when you want a conversational assistant to work with notes, drafts, tasks, and planning.
Best for:
General note search and editing.
Drafting and rewriting note content.
Reviewing tasks and planning the day.
Users who prefer a desktop chat interface.
Watch for:
JSON syntax errors.
Claude Desktop needing a full restart.
npx or Node.js not being installed.
Existing MCP servers being accidentally overwritten.
linkClaude Code
Claude Code is terminal-first. It is useful if you want your coding assistant to pull context from Amplenote while working in a repository. For example, you can store product specs, meeting notes, or implementation plans in Amplenote, then ask Claude Code to read them before changing code.
Best for:
Coding workflows that depend on notes or specs.
Turning Amplenote project notes into implementation steps.
Cross-referencing notes with files in a repo.
Users who already use Claude Code.
Watch for:
The claude mcp add option order.
Choosing the right scope. Use --scope user for a personal Amplenote connection across projects; use local/project scope only when you intentionally want the connection limited to one repo.
Verifying with /mcp.
linkCodex
Codex stores MCP configuration in TOML rather than JSON. The Codex CLI and Codex IDE extension share the same configuration, so once the server is configured in ~/.codex/config.toml, it is available in both places.
Best for:
Coding workflows that use OpenAI Codex.
Users who prefer editing a single config file.
Workflows where Amplenote contains specs, task lists, or project notes that Codex should reference.
Watch for:
TOML syntax errors.
Whether you are using the copied npx mcp-remote config or Codex’s newer direct HTTP config.
Starting a new Codex session after editing config.
Verifying with /mcp.
linkTroubleshooting
linkamplenote does not appear in the LLM app
Check that Amplenote Desktop is open, the MCP toggle is enabled, and the copied URL in your config matches the URL currently shown in Amplenote Settings.
linkClaude Desktop does not show the MCP/tools indicator
Restart Claude Desktop completely. Then check the JSON file for syntax errors. Claude Desktop logs MCP connection errors in ~/Library/Logs/Claude on macOS and %APPDATA%\Claude\logs on Windows.
linkThe client says npx cannot be found
Install Node.js LTS and confirm these commands work in a terminal:
The Claude Desktop and Codex copied configs use npx to run mcp-remote, so Node.js must be available to the app. The MCP setup docs similarly recommend checking Node with node --version when using npx-based MCP servers.
linkClaude Code command fails
Use this option order:
Then verify:
linkCodex does not see the server
Make sure the [mcp_servers.amplenote] block is in ~/.codex/config.toml, not inside another unrelated TOML table. Start a new Codex session and run /mcp.
linkThe LLM can read but not write
Some providers ask for approval before tool calls that modify data. Approve the specific tool call after checking what it intends to do. If the LLM is not choosing write tools, be explicit: “Create a new note,” “append this markdown,” or “update that task.”
linkThe LLM modifies the wrong note
Use narrower instructions. Include note titles, tags, approximate dates, or a requirement to show candidates before editing:
Find the three most likely notes first. Do not edit anything until I choose one.
linkThe connection worked before, then stopped
The local port, bearer token, or desktop app state may have changed. Return to Amplenote Settings, confirm the MCP server is enabled, copy a fresh config, and replace the old one in your LLM app.