If you're tired of the janky WYSIWYG editor provided by your blogging platform of choice, you might be curious how to use Amplenote to author blog posts that update in real time. In this article, we'll showcase the steps to publish a note from Amplenote to Wordpress or your blogging platform of choice, using a custom stylesheet that emulates the look and feel of Medium.com.
Expect it to take around 10-15 minutes to get your blog fully setup for publishing styled notes from Amplenote, depending on your fluency with uploads and blogging platforms. We'll walk you through the process below.
Amplenote is designed to take your best ideas, distribute them among collaborators, and distribute them to an audience via your website or blog

linkAmplenote embedded blog SEO performance
One of the most common questions we get about blogs created through Amplenote embeds is whether Google can index their content, and how they perform in general for SEO?
On the first count, the answer is "yes, Google can and will index the full content that is embedded in your blog" when Google scrapes your page. For example, see the search result for a GitClear blog post that was embedded via Amplenote. You can also search for content within the blog posts at bill.harding.blog to confirm that Google indexes content from the body of embedded Amplenote blog posts.
With regards to how these blog posts perform in general, it's a difficult question to empirically answer. In our measurements, the average embed loads in less than 500ms, which is well within the range of content load times recommended by Google. Here are the impressions and click counts for an assortment of blog posts authored in Amplenote. Our experience is that the content of the blog post is the major determinant in how well it will perform in Google.
linkExamples
Here are a few example blogs that use Amplenote for publishing:
GitClear blog. A developer learning and productivity tool that has used Amplenote for all its blogs since 2019.
bill.harding.blog. A developer interest blog, best known for its "Linux touchpad like a Macbook Pro" project.
Noteapps.info blog. A note app feature comparison index.
Amplenote's own blog. Of course our own blog is also powered by notes, though this implementation is a setup differently than will be described below, since it relies on server-side rendering
The biggest benefit to using Amplenote as a blogging platform: when you realize a link or screenshot needs to be updated, or some other material change needs to happen to the blog, the process of updating the blog post is as simple as opening a note in one's notebook and changing the link/image/word in question. There is no process of logging in to Wordpress, finding one's list of blog posts, opening it for edit, publish, edit, publish, edit, as you polish it to final form.
linkAdd the custom stylesheet as a file hosted on your blog
To publish an embedded note with Medium-inspired styling, you need a stylesheet file that exists on your blog's domain with the proper CSS rules. Here is the content of the stylesheet you will be adding:
You can also download this stylesheet as a file from GitClear.
This stylesheet content needs to be uploaded to your blog host. This can be accomplished by using the File Manager or an FTP/SFTP tool provided by your host. The exact path through which a stylesheet gets uploaded will vary by domain host, but we'll review a typical upload process in the following section.
linkCSS file for blogs with dark themes
If you're looking for a stylesheet that is dark-background friendly, find an example here.
linkUpload the stylesheet file to your host
Almost all blog hosts, like GoDaddy, offer a "File Manager" or "FTP Upload" tool. This will often be hosted from within a utility called "cPanel." It might look something like this:
Once you're in the File Manager, you want to navigate to a public directory (or a public/stylesheets directory, if it exists). It might look something like this:
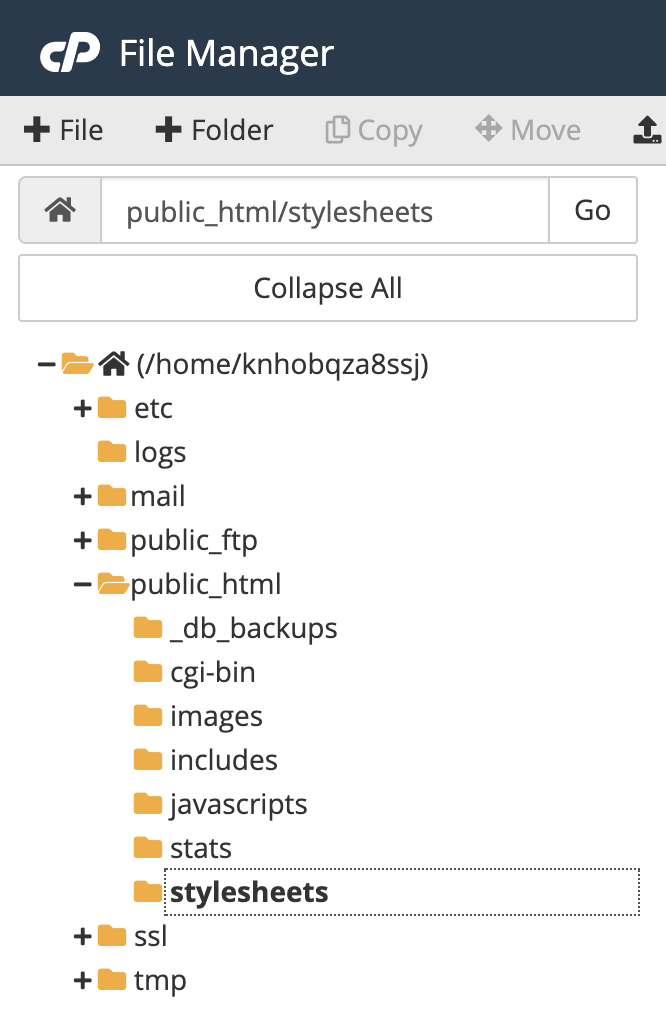
So in this example case, if you had named your stylesheet file blog_style.css (like the GitClear stylesheet) and uploaded it to the stylesheets directory, then the full path to your CSS file would be https://www.my-web-domain.com/stylesheets/blog_style.css. This is the path you will need to enter when you publish your note, so save it somewhere easy to find later.
linkSet up the embedded note
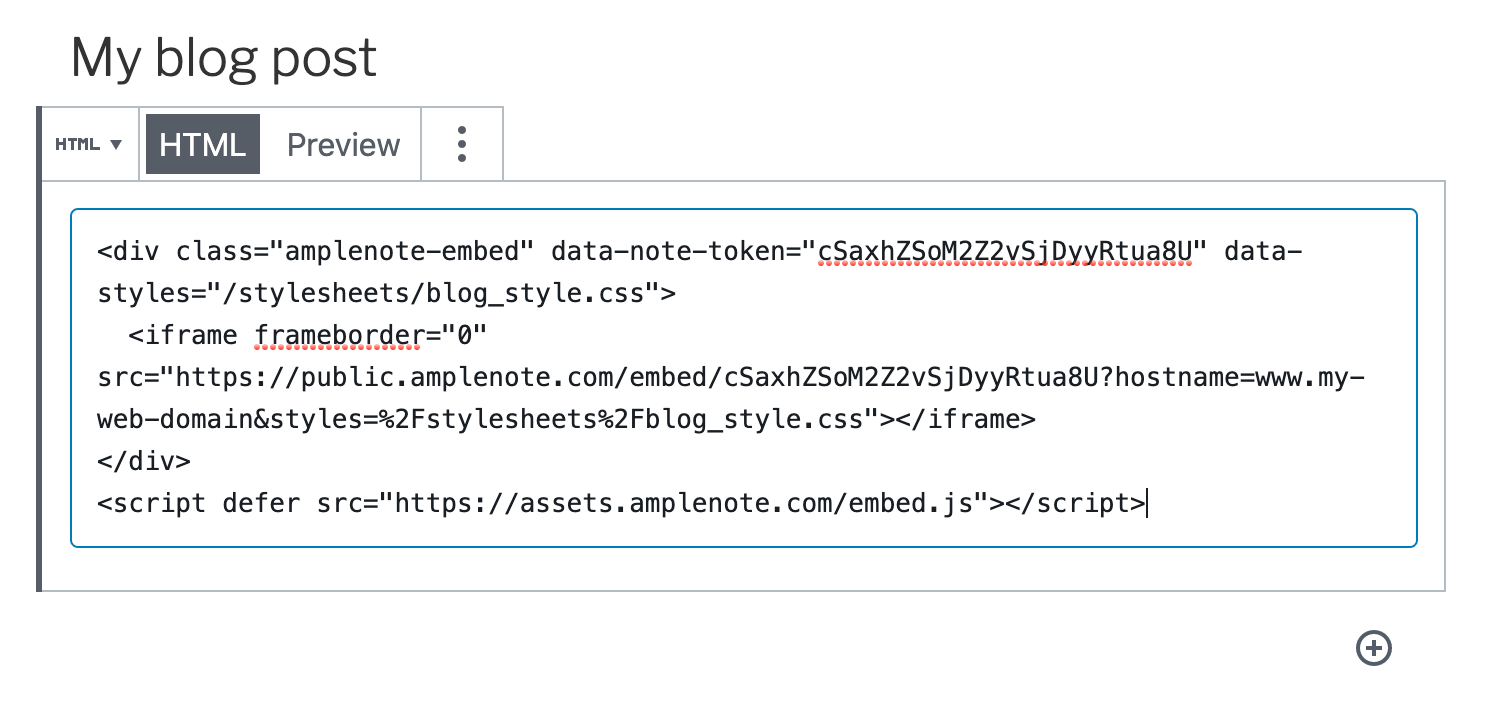
At this point, you've done with the hard part. 💪 Now you just take the path to the stylesheet you uploaded, and enter it into Amplenote's "Embed" Note Content" dialog. Assuming that your domain is www.my-web-domain.com and your stylesheet is located at stylesheets/blog_style.css, then this is how your embed options would be configured:

linkPost the blog
To post the blog, just paste the HTML that you had copied from the Amplenote embed dialog. If you're using the default Wordpress editor, you'll need to ensure that the text you're pasting is interpreted as HTML. This requires changing the block to be "Custom HTML":

Which lets us paste the the final result:
From there, hit "Publish" and the note you created will be published as a live-updating blog post! From that point forward, any time you make a change to the note in Amplenote, your blog post will automatically update in real time. 🎉
linkEmbedded blog performance characteristics
If you're an SEO specialist or a developer with a fine-tuned eye for page latency, you're likely to appreciate the several rounds of optimization that have been spent to ensure that embedded content loads alongside neighboring page content:
A brief demo of loading embedded content. Repro the demo for yourself at the blog post featured in this 16s movie. To be clear, there is extensive caching used to achieve this result, but none if it happens on the client -- all of the caching happens server-side so it remains snappy to every new visitor.
How can content from your notebook be rendered to a web browser in less than 200ms? The most important step is the CDN caching we undertake to populate edge nodes with a 2 hour time-to-live when any embed content is requested. While the initial request has been observed to take 350-500ms, for however long thereafter you have a visitor within a 2 hour window, your content will be propagated to edge nodes where it can be served to visitors at lightning speed, even if the browser has never visited Amplenote or cached any stylesheets/javascript used to render embedded content. 🎩

Comments
Login to leave a comment