linkHow do I create a table in Amplenote?
To insert a table, use the corresponding button in the formatting toolbar, either on web or mobile:
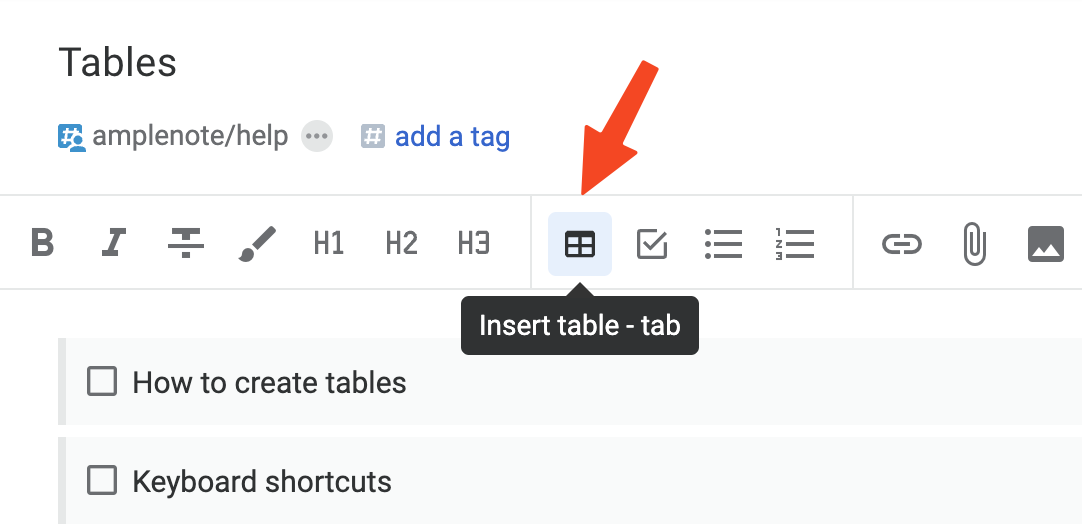
Inside the Web app, the fastest way to create a table is to use the Tab key.
Upon creation, your table will only have one cell. To insert additional columns or rows, place your cursor inside the cell and check out the formatting bar again:
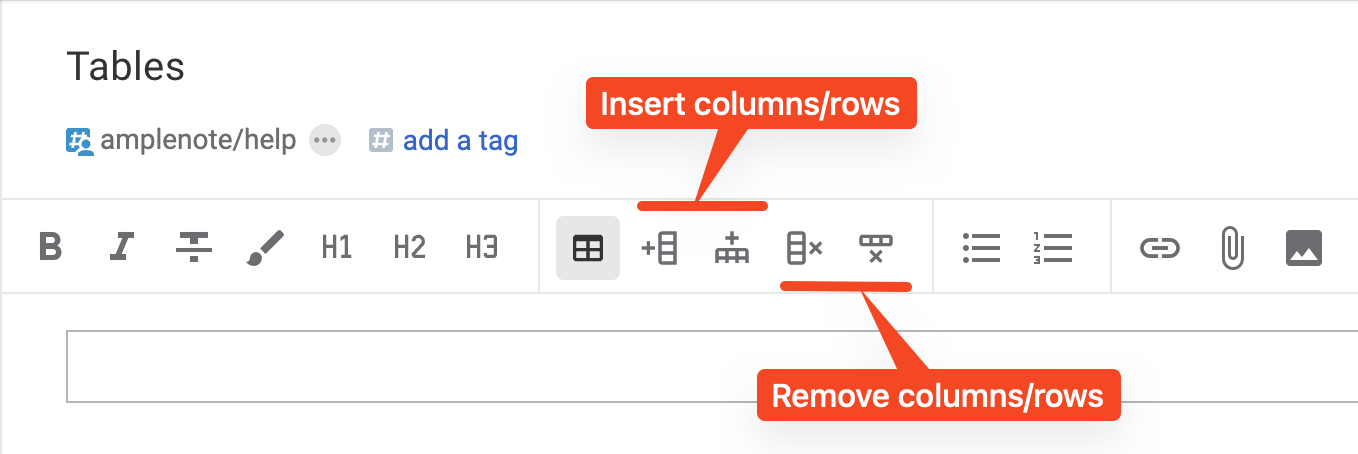
Adding a new column will append it to the left of the current cell and adding a new row will insert it above the current one:
linkTable manipulation using the keyboard
Action | Windows | macOS | Conditions? |
Delete a row |
|
| While on the last row, if empty |
Delete a row/column |
|
| While on a full-row/full-column selection, if selection is empty and has no formatting |
Delete cell contents |
|
| While on a cell selection |
Delete/clear cell formatting |
|
| While on a cell selection, if selection is empty |
Insert a row above |
|
| While in front of the first word, first column |
Insert column to the right |
|
| While on the first row, last column |
Insert row below |
|
| While on the last row, last column, when last row is not empty |
Insert row below |
|
| While on the last row, if it's not empty |
Move cursor a cell down |
|
| |
Move cursor a cell to the left |
|
| |
Move cursor a cell to the left |
|
| While in an empty cell |
Move cursor a cell to the right |
|
| |
Move cursor to the first cell |
|
| While at the edge of the cell |
Move cursor to the last cell |
|
| While at the edge of the cell |
Rearrange column left |
|
| |
Rearrange column right |
|
| |
Rearrange row down |
|
| |
Rearrange row up |
|
| |
Select cell |
|
| While cell contents are selected |
Select cell contents |
|
| |
Select current-to-first cell |
|
| |
Select current-to-last cell |
|
|
linkSelecting cell ranges
You can select multiple cells using one of the following options:
Shift-Arrow-keys, for example Shift-Down to select the current cell and the cell below it.
The mouse cursor, by clicking and dragging over your desired selection
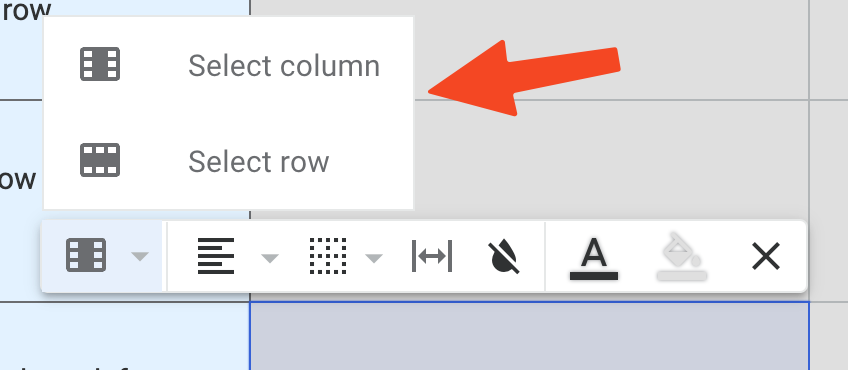
The Table Cell Formatting Toolbar:
Hover on exterior table borders:

Once you have a cell range selection, you can perform the following options:
Apply text and cell formatting and styling to the selection;
Remove cell contents, formatting, or entire rows/columns using Backspace (check out Table manipulation using the keyboard);
Copy cell information or paste new content inside the cell selection.
💡 Note that you can reorder rows and columns from inside any cell, without selecting the whole range.
linkInserting media and other types of formatting inside tables
Tables support all of the usual formatting options for the contents of a cell:
Bold / italics / | Bullet lists With sub-bullets Numbered lists too Sub-items | |
Links and Rich Footnotes |  Images with captions and alignment | Code blocks |
To insert any of the supported types of content, simply use the formatting bar just as you would do outside of a table ✨.
linkTable styling and formatting options
Whenever you select a cell or multiple cells inside a table, a formatting bar will show up exposing extra options:

The easiest way to select a cell is to press Esc twice while the cursor is inside that cell.
Let's go through the available options in the Table Cell Formatting Toolbar.
linkFormatting text inside table cells
There are 2 table-specific options for formatting text: alignment and font color:
link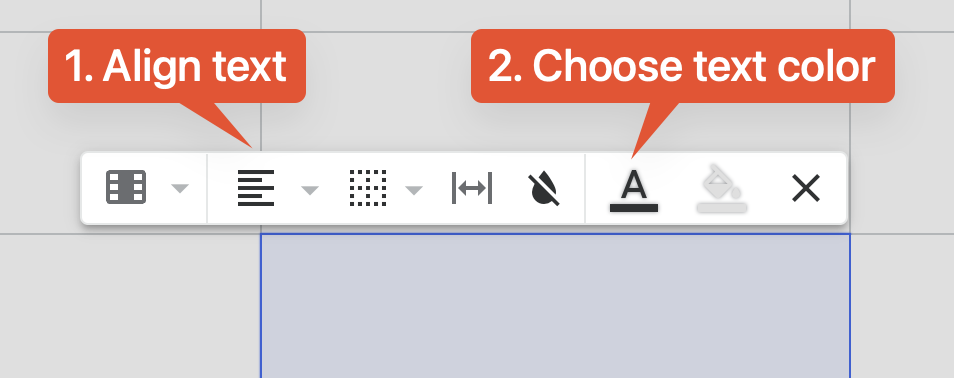
linkChanging text alignment
Here is what the 3 alignment options look like in a real table:
 | Text aligned to the right |
 | Center-aligned |
 | Text aligned to the left |
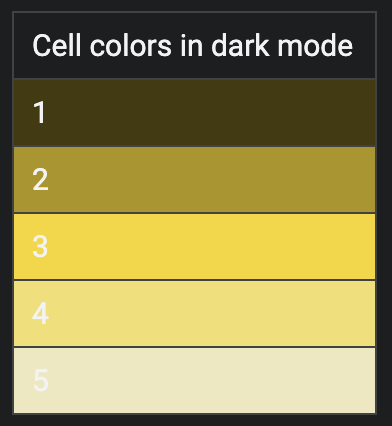
linkChanging text font color
When changing the color of the text inside your table, you can either choose from the existing palette or paste the HEX code of a custom color.
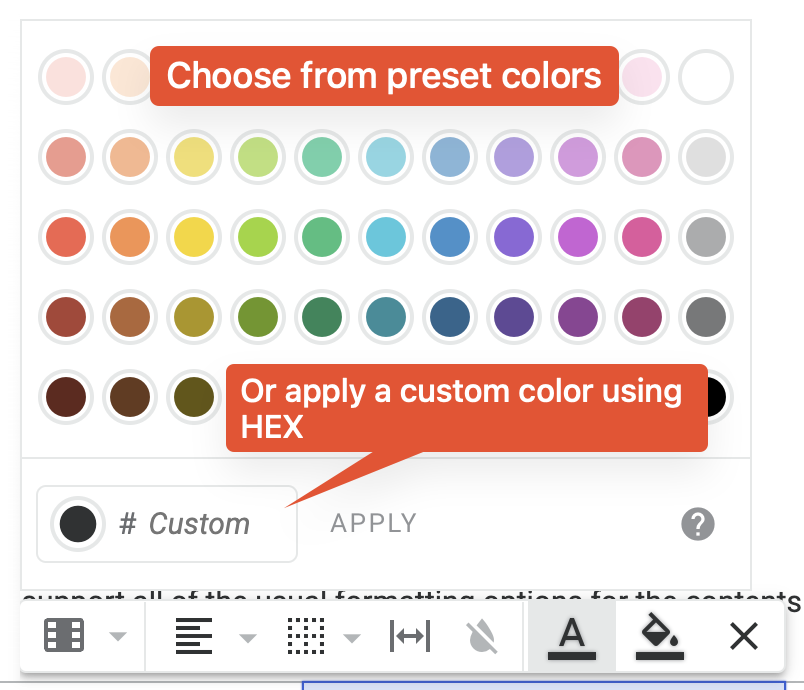
Custom colors remain the same all the time, while the preset options adjust dynamically when you switch between light and dark mode 💡:
 |  |
linkStyling and resizing table cells

In addition to text formatting, cells can be customized in the following ways:
By adding or removing cell borders;
By changing the width of the columns;
By applying background colors for cells.
linkChanging cell borders
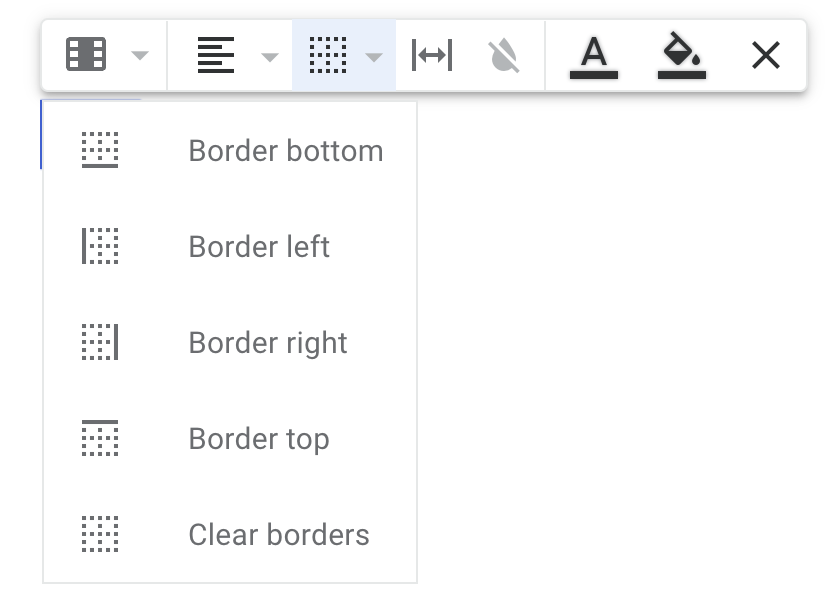
Click on an option to add that border.Click again to remove it.Alt-Click or Opt-Click to only add that border to the boundary of the current selection.
Using the Cell Formatting Toolbar, you can choose between different border options for a cell or for a selection of cells.
I'm a cell with no borders | I'm a cell with full borders | |
I'm part of a row with borders on the outside | ||
I'm part of a row with full borders | ||
I only have top and bottom borders | I only have left and right borders |
linkChanging column widths
By default, when adding content inside a table cell, the column the cell is part of will extend to fit the entire content on a single line.
This column is as long as it needs to be to fit this entire sentence. | Column #2 |
To change the width of a column, use the mouse pointer to hover over one of the vertical borders of a cell and drag to choose the desired width:

To reset the column width such that it fits the contents of the cell on a single line (with no wrapping), use this button in the Table Formatting bar:
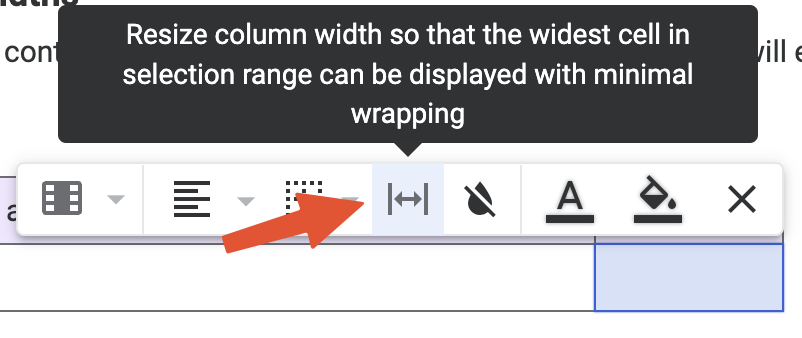
When multiple cells are selected, each column will be resized to fit the widest cell from that column.
💡 Any prior changes to the width of a column will mark that column as a custom-width column. Here are the rules of custom-width columns:
They will never be resized automatically to fit on the screen;
When the screen is not large enough to fully display a table containing columns with custom widths, the table becomes scrollable horizontally;
When converting a table to a full-width table (see below):
Only columns without custom widths will be extended to fit the screen;
If no such columns exist, custom-width columns will be extended, while maintaining their relative sizes.
linkFull-width tables and scrollable tables
The other way to adjust the widths of columns is by toggling between a left-aligned table and a full-width table:
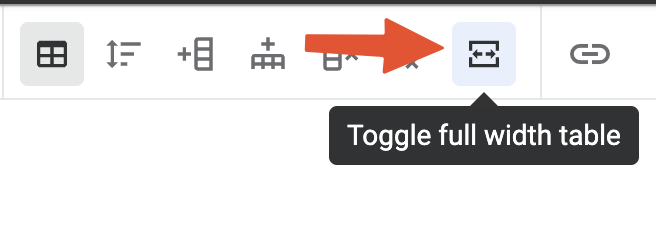
This button is on the regular toolbar, not in the floating Table Toolbar that appears when making a cell selection.
Here is what the default table looks like:
I am part of a left-aligned table (the default). | Column #2 ends here. |
And here's a full-width table looks like:
I am part of a full-width table. | Column #2 extends to the end of the page. |
When converting to a full-width table, columns that weren't assigned a custom width will extend to cover the page:
Default table:
A column with custom width | Custom width #2 | Free column |
Converted full-width table:
A column with custom width | Custom width #2 | Free column |
When converting to a full-width table where all the columns have custom widths, they will be resized while maintaining their relative sizes:
Default table:
Column with custom width | Slightly smaller | Smaller | Small | 👌 |
Converted full-width table:
Column with custom width | Slightly smaller | Smaller | Small | 👌 |
linkApplying cell background colors
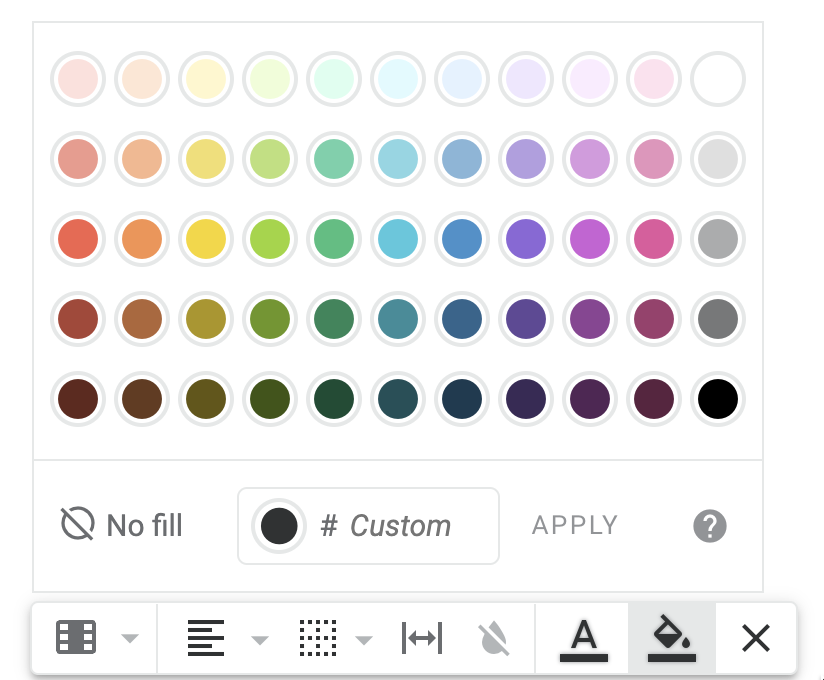
Cell background colors work just like Changing text font color: Choosing a custom color will preserve it no matter what, while picking from the preset colors will have the effect of changing the color based on the choice of dark/light mode:
 |  |
linkRemoving formatting from a cell
To quickly remove formatting from a cell, use the corresponding icon in the Table Toolbar:
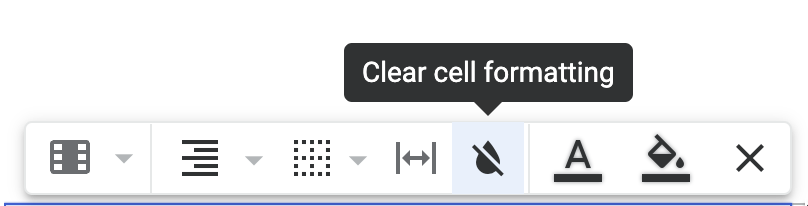
"Clear cell formatting" will remove text color, cell color, text alignment and border additions.
linkSmart column sorting
Whenever possible, Amplenote detects the contents of your tables, tries to deduce their type and will let you sort them in ascending/descending order, based on the sorting mechanism that was identified.
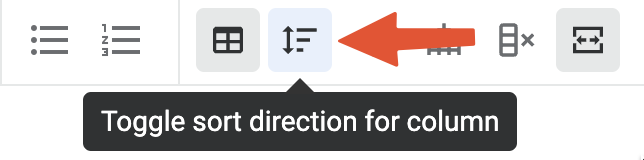
Press once to sort in ascending order, press again to sort in descending order.
💡 Amplenote automatically detects your header row if you:
Apply a different background color;
Apply a different font text color;
link📌 Use cases for tables
As of the end of October 2022, the plan for the next iteration of tables is to support formulas! After that patch, tables will be considerably more powerful in Amplenote and will support advanced use cases such as Budget Planning, Expense Tracking, Workout Tracking, etc.
For now, consider using tables for:
Organizing large sets of related data, such as company employees, inventory, concert set lists, etc.
linkUse case: Creating an Index of your Amplenote notebook
👋 This section will be added soon!
linkUse case: Visualizing daily habits
👋 This section will also be added soon!
linkUse case: A Dashboard/Homepage
👋 This section will also be added soon!